Real vegan blue cheese
| Tags: | Fermentation, Gluten free, Soy free, Vegan cheese and eggs |
|---|---|
| Preparation time: | preparations 50 minutes, cooking 10 minutes, total 60 minutes |
| Makes: | 2 small cheese wheels |
This is a recipe for vegan blue cheese with real mold, which tastes just like a cow's milk cheese! All you need are a strong blender or food processor, a few simple kitchen utensils, some cashew nuts and the mold culture.
This recipe is inspired by the blue mold cheese of Thomas from Full of Plants, who is also a real vegan cheese pioneer. My version of the recipe contains more coconut oil, resulting in a creamier cheese with a stronger flavor. Also check out my brie recipe, which is very creamy as well.
I ordered the mold cultures online from Cashewbert. If using the mild version, your cheese will resemble roquefort. With the strong culture it becomes more like gorgonzola.
If this is your first time making a fermented vegan cheese, you may feel a little anxious. Don't worry! If you just work cleanly and make sure that no other types of mold grow on the cheese, it will all be fine. You do need a little courage and a lot of patience to make this cheese, but it's totally worth it.
Ingredients
- 1 1/2 cups raw cashews nuts
- 2 tablespoons of refined neutral coconut oil, melted
- 3 tablespoons of plant-based yoghurt (or use a total of 8 tablespoons of rejuvelac instead of yoghurt and water)
- 5 tablespoons of water, or more as needed
- 1/16 teaspoon penicillium roqueforti powder
- 1/3 teaspoon of salt + extra for sprinkling the outside
Instructions
Put the cashews in a pan with plenty of water and cook for 10 minutes until soft. This kills any unwanted fungal spores that may be on the nuts. After cooking, drain the cashews and let them cool to room temperature. In the meantime, thoroughly clean all necessary kitchen appliances such as the blender, spatulas and containers, for example in the dishwasher or by rinsing them with boiling water.
Add the boiled cashews to a blender or food processor with the coconut oil, yogurt, water, penicillium powder and salt. Puree until completely smooth, creamy. If blending is difficult, you can add a little more water, but not too much, otherwise the cheese will not firm up properly later.
Line two small round containers or baking tins with plastic wrap. Divide the blended cheese mass over the containers and put them in the fridge for at least 12 hours to firm up. When the cheeses have set, carefully remove them from the molds. Peel off the foil and sprinkle the outside of the cheese with a little extra salt. This is very important to prevent the growth of unwanted foreign fungi. Place the cheeses on a piece of parchment paper in a sealed plastic container. The cheese must have enough space to breathe. Avoid touching the cheese with your hands, especially in the beginning, to avoid contamination with the wrong fungi and bacteria.
Place the container in a room where the temperature is max. 10 degrees C or 50 F between 11 and 15 degrees C / 50-60 F. If you do not have such a room, the least cold spot in your fridge will do if you don't set it super cold (often the top shelf is warmest). A separate fridge thermometer is useful to know the exact temperature.
The cheese should now ripen at this temperature for about 4-5 weeks. Turn it over every day using a piece of parchment paper. If condensation forms in the container, you can wipe it away with a paper towel. Replace the parchment paper if it starts to get wet. The closed container helps to maintain the humidity, but it should not be too wet.
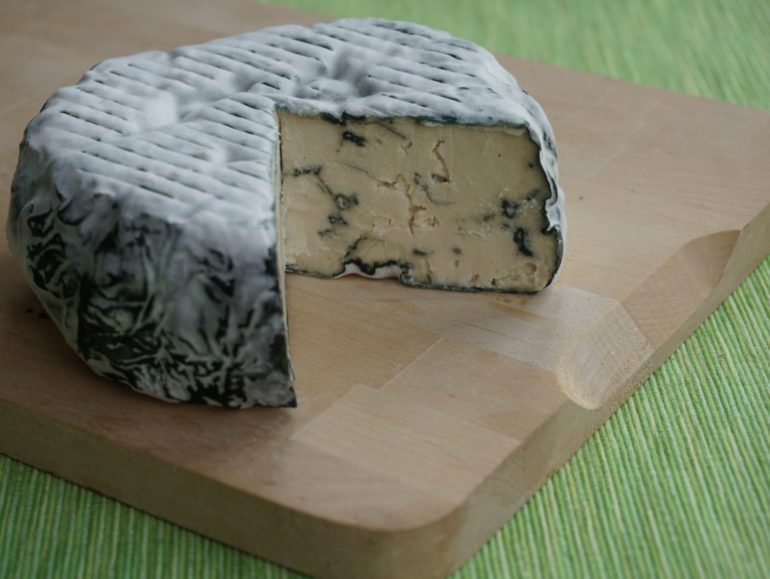
After 5 to 8 days you will see the first mold growing. The mold is often white at first and then turns green-blue to dark blue. As the cheese gets more firm, you can place it on a sushi mat or special cheese mat instead of on the parchment paper, so that more air can reach the bottom. Keep turning it over regularly so it doesn't get stuck to the mat. If the mold grows faster on one side of the cheese than the other, you can leave the slow side up for a few days. Then still detach it from the bottom of the mat every day.
There are two ways to get beautiful blue veins in the cheese. After it has firmed up, you can poke holes in the cheese with a sanitized chopstick or knitting needle. Another option, which works best in my opinion, is to wait 2-3 weeks until the outside of the cheese is nicely blue and then scramble the cheese and roughly stack the chunks back into your foil lined shaping containers. The mold from the outside of the cheese is now also on the inside and because of the rough texture, there are little air pockets in the cheese so the veins can grow. The next day, when the scrambled cheese has firmed up again, remove the foil, sprinkle some extra salt on the cheese and and continue turning it daily as you did before.
After about 4 weeks, your cheese is nicely covered with a thin layer of blue or blue-white mold. You can eat it now or let it ripen for a few more weeks at a lower temperature, so that the flavor develops even further. The mold will continue to grow slowly and the taste will get even stronger.
A Dutch translation of this recipe can be found here.
2 Reacties
Write a comment